Note
This tutorial requires to import a specific package and is not provided with the Xareus Package for now. If you are testing or evaluating Xareus, you can browse the Scenario and Relation engine sections
Introduction Tutorial
This tutorial aim to explain the bases of Xareus' relations and scenarios. In this tutorial, we will see a simple usage example of how the relation engine and scenario engine could work together. A Unity package is provided with the tutorial. It contains three scenes with everything necessary for the tutorial. Each scene is composed of the same types and relations. We will look at, for the same interactions, different ways to do scenarios. The three examples are complete and functional, the document will explain how do they work and let you modify yourself a scenario.
After this tutorial you will be able to use the bases of Xareus.

In order to follow the tutorial and be able to interact with the scene, you will need the last update of Xareus. For this tutorial, you will need a good knowledge of the engine Unity3D and Xareus. Some concept about Xareus will be explained here but if you have never heard about it before please refer you to the documentation first.
Virtual Environment
Scene composition
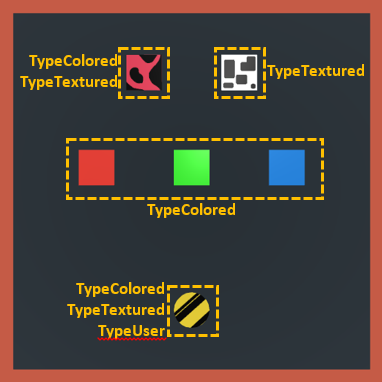
The scene is composed of three types (TypeUser, TypeColored and TypeTextured) and two relations (SwapColor and SwapTexture). It shows one circle representing the user that can move in the scene and five unmoving squares.

When you open one of the three scene, every element will be white. They will take a color and a texture when the scene started. The user object, represented by the circle, will follow the movement of the mouse when left button is pressed. We will use this type distribution for the entire tutorial.
Types
We use Types to add behaviors to an object. It is generic and can be associated to multiple object without any adaptation.
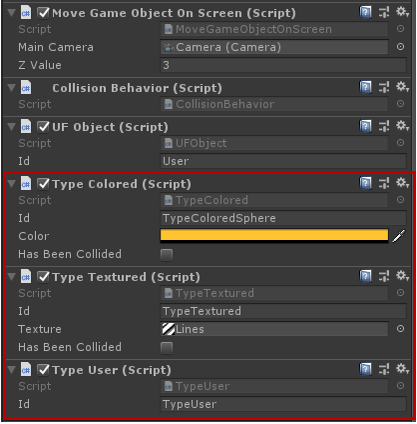
In Unity, a type is represented as a script component. Here is the scripts present on the GameObject User represented by a circle

- TypeColored: Apply the provided color to the object's material when the application start
- TypeTextured: Apply the provided texture to the object's material when the application start
- TypeUser: An empty type to recognize the user on specific relation
You can add types on any object you want. You could create another object of any shape and add it a type TypeColored, TypeTextured or both as a component.
Relations
For a Relation to be recognized, by the relation engine and the scenario, you need to assign the corresponding script to a GameObject in the scene.
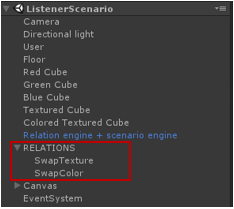
You will find the relations in the hierarchy window, in the empty GameObject RELATIONS.

Once Relations and Types are in the scene, you can make any query that involve them. The tutorial gives you a simple example how to do it.
In the Listener Scenario scene, the GameObject User has a script CollisionBehavior that wait for any collision with another object and try to get the realization corresponding to these two object. Then, it executes all the realizations if possible.
public class CollisionBehavior : MonoBehaviour
{

	private void OnTriggerEnter(Collider other)
	{
		UFObject otherObject = other.GetComponent<UFObject>();
		if (otherObject != null)
		{
			//creating a query with all relations
			UFRealizationQueryParameters query = UFRealizationQueryParameters.GetQueryAllRelation(UFManager.instance.ufIRelationEngine);

			//adding mandatory object to the query
			query.MandatoryObjects.Add(gameObject.GetComponent<UFObject>());
			query.MandatoryObjects.Add(otherObject);

			//getting every realization corresponding to the query
			UFManager.instance.ufIRelationEngine.GetRealizations(query, HandleQuery);
		}
	}

	private void HandleQuery(List<UFRealization> realizations)
	{
		//executes all the possible realizations
		foreach (UFRealization realization in realizations)
		{
			UFManager.instance.ExecuteRealizationIfPossible(realization);
		}
	}
}
This is the simplest way to execute a realization. However, it has a problem too. Since we are looping through every possible realization given by the engine, we got twice the same relation. If we take the example of the relation SwapColor, it needs two collided TypeColor to run. Therefore, the engine will give you two possible realizations:

When the engine executes the realizations, it looks like nothing happen but the two realizations were well executed. The second realization cancel the first one since they are both swapping color of each other. One solution to avoid this is to better specify the relation by using object patterns. You have the possibility to ask multiple Types for one object in a relation. By doing this you make sure one of the two object is of type Colored and User (See script shown of RelationSwapColor).
	public class RelationSwapColor : UFRelation
	{
		[UFObjectPattern("TypeCube", "Cube")]
		public TypeColored ColoredObject1;

		[UFObjectPattern("User", "Sphere")]
		public TypeColored ColoredObject2;

		[UFObjectPattern("User", "User")]
		public TypeUser UserObject;

		public override bool IsRunnable()
		{
			return ColoredObject1.hasBeenCollided && ColoredObject2.hasBeenCollided;
		}

		public override void Run(Action resultCallback)
		{
			ColoredObject1.SwapColor(ColoredObject2.gameObject);
			resultCallback();
		}
	}
Object patterns allow the use of multiple types on a same object for an interaction. The name you give to the object pattern in the relation is free, but it is preferable to keep an understandable meaning.
Scenario
A Scenario can be used with or without the relation engine. Scenarios can be state driven or action driven (or a mix of both):
- State driven. The scenario waits for specific states of some part of the world (for example, the light must be off) before advancing to the next steps.
- Action driven. The scenario waits for a specific user action (that can be a relation) to be performed
The Scenario model gives you two main ways to work:
- Listener scenario. The scenario advances when some actions are performed or some state is reached without restricting the actions the user can perform.
- Restricted scenario. The actions that the user can perform are restricted to the ones that will make the scenario advance to another step.
Listener Scenario
The unity scene ListenerScenario, provided in the package, is an example of a scenario listening the virtual environment. The scenario communicates with the virtual environment through sensors and effectors. Here, effectors are optional and are used to display messages for the user. However, sensors are necessary for this scenario, especially RelationSensor. They will listen to the virtual environment and user actions and react in consequence. A RelationSensor waits for a specific relation to happen. You can specify which objects are mandatory for this relation, and if you leave the field object uncheck it will wait for any specified relation to happen.
Restricted Scenario
The unity scene RestrictedScenario is an example of a scenario restricting the user in the virtual environment. It is the same scene than the pregvious one, except for the CollisionBehaviour script. Every interaction is done by scenario here. In this case, sensors and effectors have to be combined. Our first sensor is a CollisionSensor, waiting for a collison between two specific objects. Then the RelationEffector is launch, corresponding to the collision. To do the exact same scenario than previously, it needs more transitions, resulting in a more complex scenario.
Note
For multiple relations with one action, you will need as many RelationEffector as relation. One collision can generate multiple relations.
Alternative Restricted Scenario
There is another way to restrict the user in a virtual environment with a scenario. The unity scene AlternativeRestrictedScenario gives you an example. It uses the same scene and scenario than ListenerScenario. The scenario can give us information about its state. We can ask the scenario to give us all the enabled transitions (transitions with a sensor and an upstream token), collect each relation contained in the RelationSensor from these transitions and execute the relation if one or more of them are runnable. With this approach, we keep a simpler and restricted scenario. On the other hand, it needs additional scripts, not necessarily easy to understand.
To learn more about this approach, see the Restricted Scenario by script article.